zaterdag 28 maart 2009

Cushion covers.

Sewing the cushions covers is straightforward. First I cut out the top and bottom with the mdf templates I used for cutting the foam. Make them 1 cm wider than the template. This is the distance between the needle of the sewing machine and the side of the foot of the sewing machine. To stich the panels & sides together, just hold them together and make sure while stitching to keep the edge of the fabric at the edge of the sewing machine foot (hope it is clear what I mean).
I used a chalk to mark the outline of the panel on the angled side of the cushion.
I stiched the zipper to the inner side of the fabric.....
.... and then cut the zipper-opening from the outside. Worked well, although I guess you can only do it this way with a fabric dat doesn't fall apart at an edge which is cut.
End result. Have to work a bit to get the cushion cover at exactly the right place, but it seems it will work out fine.

dinsdag 17 maart 2009

Foam for cushions

Cutting the foam for the cushions with a hot wire tied to two bolts. I used an ordinary car battery charger. Worked well. Had to jump start the charger with a 9V battery because it will only shut on after it detects a working battery. Current is automatically reduced within working range of the charger; I guess this is standard for most modern chargers.
I first experimented with some electric guitar string as a cutting wire. This didn't work at all so I had to order proper cutting wire - a big difference as you can see on the photo below. I got quite some cutting wire left, so if anyone is interested I can send some by mail. I also have some spare frontrunner fabric (Jay sent me quite a big piece) for the rudder cassette. If anyone is interested, let me know. This stuff is hard to find (at least in Holland).
Trial fit of cushions below. A seperate cushion with lifting straps will go on top of the lid in the front bunk.
To cut the cushions I made wood (MDF) templates of the top and bottom. To make the top templates I measured the angle of the side of the boat every 50 cm and calculated the added width. Extra widht varies between app. 12 cm (in back of cabin) to 1,5 cm (near bow).

maandag 9 maart 2009

Non skid done

Before painting the non skid I first had to apply masking tape. It's very important to use good masking tape, because the thin two pack paint will easily get under the tape. I took care to buy good tape, but still had some leaks. Maybe I'll touch those spots up with a small brush and some white paint but... maybe I won't.

Marking the outline of the non skid on all the sloping areas of the hull is very easy with this tool. I made a small mark on the upper part of the tool, and used that to put some dots on the hull. Then draw a line with a flexible batten and put the masking tape on.
Corners are rounded. Step 1: draw a corner.
Step 2: carefully cut the corner.
Step 3: remove offcut.
End result. The cockpit floor edge looks a bit messy on this picture because the masking tape is still on.


Now it's time for the nice work: bolting on all the hardware. I'm going to wait till my friend Eelco and my brother Hans have time to come and help. They have helped doing all the dirty work, it wouldn't be fair to keep all the nice work to myself.

dinsdag 3 maart 2009

And now, the end is near...

....or so I thought.

When painting the boat I felt it wouldn't be long before I could go sailing, but today I made a to do-list and it's quite depressing how much still has to be done. I'll keep the list on this site as a reminder and also to make me happy seeing it getting shorter and shorter.

Main hull:

-
Painting non-skid DONE 8/2/09
- Sawing + gluing Perspex sliding hatches - DONE 9/3/09
- Plastic strips to slide hatch
- DONE 9/3/09
- Make outboard mount -
DONE 12/3/09
-
Cutting foam for cushions - DONE 13/3/09
- Wooden strips to retain perspex hatches - DONE 13/3/09
- Fitting windows
- DONE 15/3/09
- Fitting hatch + bolts - DONE 15/3/09
- Install outboard mount - DONE 15/3/09
- Install mast support-tubes DONE 15/3/09
- Sewing cushion covers DONE 15/4/09
- Bolting on hardware DONE 18/4/09
- Bolting on hatch + inspection port DONE 18/4/09
- glue cover plate centreboard line DONE

- INstall centerboard retaining cap DONE
- make rollers for mast support DONE 22/05/09
- Ordering PETP DONE 11/05/09
- weld mast support DONE 22/05/09
- Weld maststep DONE 03/06/09
- making bushes rudder DONE 10/06/09
- Finish + Install maststep DONE (installing) 13/06/09
- Wax on boat
- Make tiller
- Saddle eyes in beam recesses

Floats:

- make 1 wingnet support - DONE 14/3/09

- Make slots for deadeyes - DONE 23/4/09
- attach wingnet support DONE 26/04/09
- fixing last dings - DONE 08/05/09
- new HD inserts (updated plans) NOT DONE-NOT NECESSARY
- fair wingnet supports DONE 08/05/09
- Bolt rope extrusion on supports DONE 15/05/09
- one new coat primer DONE 08/05/09
- 2 layers paint DONE 10/05/09
- non-skid DONE 11/05/09
- bolt on u-bolts + padeye DONE 15/05/09
- bolt on hatches DONE 15/05/09
- bolt on inspection-ports Done 15/05/09

- drill holes beams - DONE 18/05/09

Sails:

- Pick sails up at sailmaker DONE
- buy line for sheets DONE 10/06/09
- Furler DONE 23/05/09

Rig:

- Buy dyneema for shrouds and halyards DONE 10/3/09
- Dig out hole in mastfoot-rod (lathe) - DONE 16/3/09
- Fit sheaves DONE 21/3/09
- Fit T-terminal holder for diamond wire - DONE 21/3/09
- Fit forestay-tang - DONE 21/3/09
- Buy Precourt deadeyes or the like - DONE 20/3/09
- Fit exits DONE
- Weld mastfoot DONE 22/05/09
- Weld mastfoot in mast DONE 22/05/09
- Make bearing for mastfoot (UMHDPE/delrin)
- Fit spreaders DONE 10/05/09
- Press lower terminals on wire DONE 14/05/09
- Fit lower terminal holder for diamond wire DONE 13/05/09

- Fit cleats
- Attachment shrouds: Olivier link or padeye?
- Make A-frames for mast raising wires (or as per plans)
- Mast raising wires + attachment
- Cut + weld mast raising pole DONE 10/06/09
- Mast raising wires
- buy line for traveller

Folding system:

- Buy POM rod to make acetal washers DONE 11/05/09
- Cut washers out of POM rod
- DONE 22/05/09
- bolt wingnet eyes to beams - DONE 16/05/09
- make dummy float decks DONE 14/05/09
- Install all hardware on main hull DONE 23/05/09

- bearing plates on beams
- Beam end caps DONE 14/06/09
- install beams DONE 24/05/09
- drain-pipes in floats
- make + install float retaining thingy DONE 03/06/09

Trailer:

- Make main support for hull DONE
- Make connector for extra set of lights DONE

- Buy extra set of lights + plates + cables DONE
- Make support to hang extra lights at transom DONE

- Buy marking sign DONE
- Make new attachment for existing side supports DONE
- Make float supports DONE
- fog lights on trailer (re-wire)

- new lower weel arches DONE

Other:
- Sew trampolines
- Buy lacing line
- buy outboard

- buy hoisting slings + hooks DONE 02/05/09
- Rent crane to get mainhull out of workshop DONE
- make rollers to roll hull out of workshop DONE
- insurance
- buy/lend MIG-welder DONE
- learn to weld MIG (a bit) DONE
- and…..big party to celebrate launch!

maandag 2 maart 2009

Multiple projects

I bought a mast from Z-spars + some parts like spreaders, tangs, sheaves, etc. When it gets warmer I'll start working on the mast, which is laying outside in my garden.
The mast section is a Z-spar 301. Unfortunately no wing-shaped section. Those are hard to find in Europe. Good thing about this mast it's relatively cheap (950 euro for the anodizes mast section) and light (3 kg/meter). I got a 12 meter section and had to cut it to length to fit it in my backgarden.
Trick to get a straight cut: wrap a piece of square paper around and use that to draw a guide-line for the saw-cut.
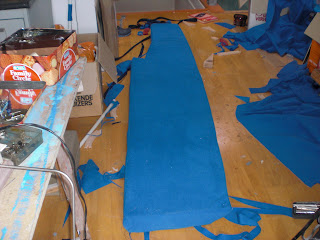
Plans have been updated: the original ruddermount is not strong enough and needs some extra glass. Here the extra glass is in place. I could have chosen the option of the side supports in stead of the glass, but thought it would be better (looking) to sand down the bog + primer and put on the glass. I checked if with the ruddercase would still fit with the extra glass. No problem.
Tip for other builders: when building the ruddercase, check the clearance in the cutouts for the gudgeons. I found out these were very tight and had to make the cutouts a bit deeper for the ruddercase to fit.
Also: don't try to put the rudder pin retaining screw in the center/front of the tube, else you won't be able to reach it. Put it angled a bit sideways (see photo below).
Interior paint is ready.
Mold + glass + plastic on top for the wignet support. Using a piece of aluminium angle is o good way to keep the glass from lifting at the 90 degree edge. The finished support is very floppy but I guess it will be very solid once it has been fitted to the float.
I bought an old bandsaw for less money then I had to pay for the 30 cm G10-tube for the rudder. Wish I had bought it earlier. This is a fantastic tool for sawing pieces of wood and aluminium, so much better than using a jigsaw. Here is the plate for the mastfoot. 3 minutes work and almost ready. As with the parts for the mast-step it's best to drill all the holes first using a drill-press. As long as you've got all the holes in the right place, it's hard to mess up these parts.
First layer of white paint (RAL 9010) is on. Tonight I will put the second layer on. After that I only need to paint the grey non-skid to basically finish the hull.